Shot a great video but not loving the background? Or perhaps you want to reuse some old footage and repurpose it for a new campaign? We’re going to show you how to add a background to a video online, in iMovie, Movie Maker and Animotica.
Add background to video online: Unscreen
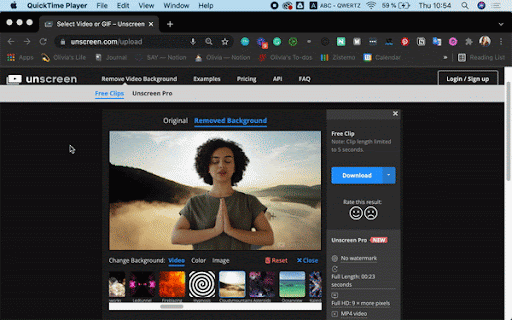
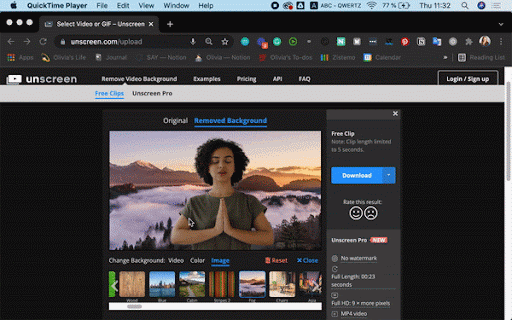
The fastest and easiest way to add a new background to your video is with Unscreen. The AI-powered tool only takes a few seconds to do this, here’s how:
1. Go to Unscreen.
2. Upload your video by clicking on > Upload Clip or dragging and dropping it onto the screen.
3. Wait a couple of seconds until the background is fully removed.
4. Now go ahead and click on > Change background.
Here you can add video backgrounds like this:
1. Upload your very own video background (for instance if you’ve shot a lot of b-roll)
2. Search for a GIF background and select it as a video background
3. Scroll through our video backgrounds and select one like this:
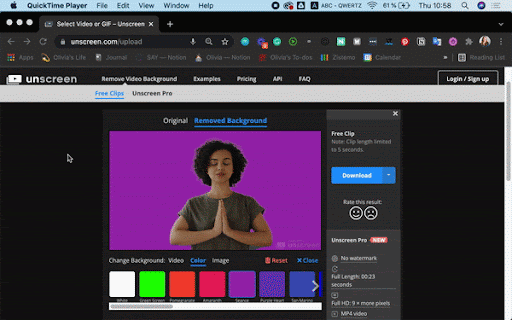
4. But you can also use a colored background by selecting the > Color tab. Like this pretty purple one:
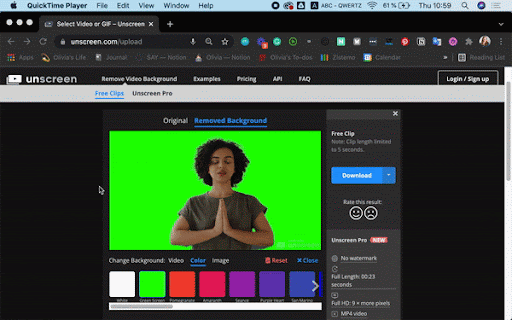
5. In this Color tab, you’ll also find the > Green Screen, which is a great feature if you want to continue editing and replacing your background in another video editing software like iMovie, Movie Make, and Animotica. We’ll show you how to use Unscreen combined with these video editors below.
Add photo background to video with Unscreen
You can also use Unscreen to add an image as a video background. Which is a still photo and doesn’t move — while your video subject still moves like this:
To do this simply go ahead and:
Open up Unscreen.
Click on > Upload Clip or drag and drop it onto the screen.
Wait a couple of seconds until the background is fully removed.
Now go ahead and click on > Change background > Image. If you can’t find an image of your liking, you can also hop on over to a free stock website like Unsplash in a new tab to find the perfect image for your new video background. Simply type in any word or topic of choice, and you’ll get a ton of royalty-free photos to choose from. Once you’ve made your choice, download the photo, open up your Unscreen tab again, and press > Upload Background.
Happy with the end result? Go ahead and > Download the image.
With Unscreen, you can download the video as a GIF completely for free. If you want to download the entire video, you can go ahead and click on > Process with Pro. You can then set up an account in just a few minutes and choose between the Subscription or Pay-as-You-Go plan. Here’s an overview of what the pricing looks like.
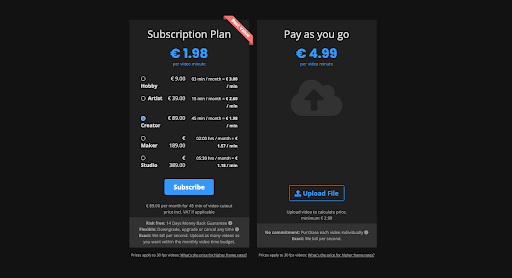
If you want to find out more about the Unscreen pricing plan or still have questions, go ahead and check out the pricing page.
How to add a background to video in iMovie
Are you editing your video in iMovie on a Mac and want to use it to add a new background? No problem. But before you do — you’ll need to use Unscreen to add a green screen to your video.
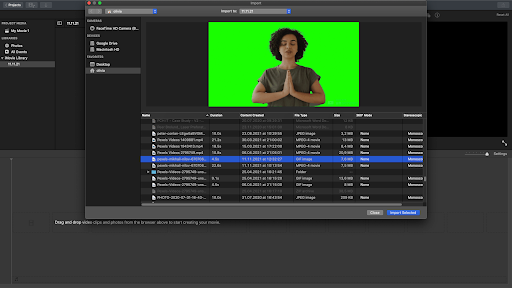
1. Export your video from iMovie by clicking this icon in the top right-hand corner of the interface > Export File. You will need an mp4, .webm, .ogg, .mov, or .gif for the next step.
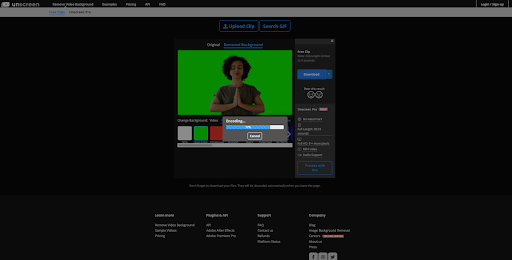
2. Once you have that, open up your browser and head on over to Unscreen. Here you can upload the video file you just exported from iMovie by dragging and dropping it into the tool.
3. Wait a couple of seconds until it does its magic and removes the background using cutting-edge AI technology.
4. Once it’s done select > Change Background > Color > Green Screen.
5. Go ahead and download the video with a green screen from Unscreen. If you want to find out more about the pricing options and qualities you can download, we talk about that here.
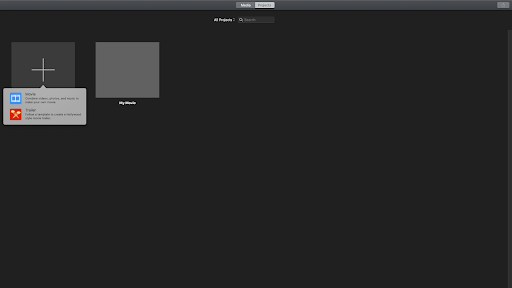
6. Once you’re done, create a new project by clicking > + > Movie.
7. Upload your video with the green screen to iMovie.
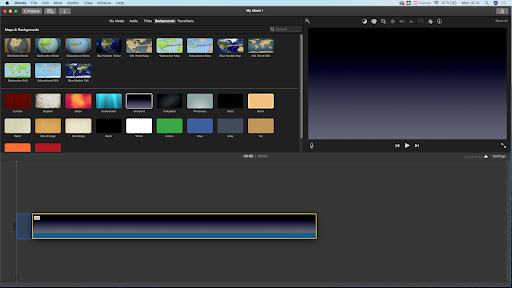
8. Now go ahead and select the > Background tab and choose a background of your liking. We went ahead and picked this black and gray gradient. Once you’ve made your choice, go ahead and drag and drop the background onto your timeline.
9. Now go back to > My Media and drag and drop your green screen video underneath the background.
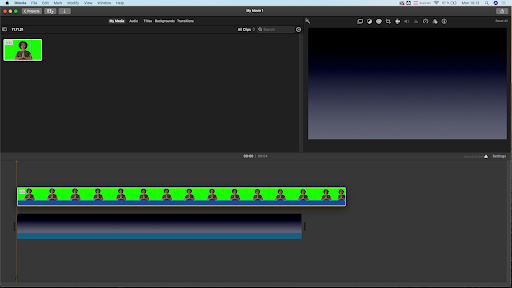
10. Above the preview window, you’ll find several icons. If you hover over the very left icon, you will find > Video overlay settings. Go ahead and click on that, and a drop-down will appear. Here you can select > Green/Blue Screen.
11. Now go ahead and click on the play button in the preview window. Voilà, now you’ll see that the background of your video has changed. You can also adjust the length of time the background is visible by dragging the edge in the timeline.
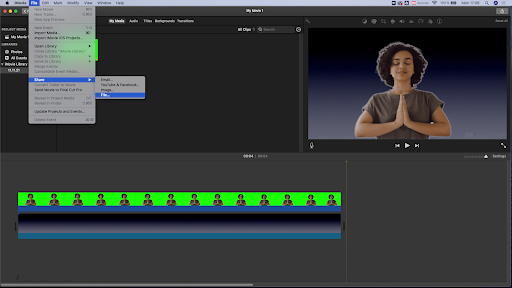
12. To save the video with the new background, go ahead and select > File in the top bar. Now go to > Share > File. Here you can configure the quality of your video. Once you’re done, go ahead and press > Next. Select where you want to save the video, we like to save it to our desktop, so it’s easy to find after. Then go ahead and press > Save. That’s it!
How to add background in video with Movie Maker
If you’re a Windows user, Movie Maker is a great option you already have on your computer to do simple video editing. The software also has an option to change the background of transitions between video clips. To do this simply:
Go ahead and choose the background you want to use, we recommend using a website like Unsplash to choose an image, or Canva for graphic designs. Just make sure it’s in the right format, Movie Maker works best with jpg., png., and tif.
Now go ahead and click on > Home and choose > Add Videos and Photos, select the photo you want to use, and click > Open.
You can now add titles and credits to this graphic or photo image.
If you want to truly change the video’s background while keeping the main character intact, we’ll show you how you can do that and upload it to Movie Maker using Unscreen.
Make sure you have your desired video saved to your computer. If it’s in Movie Maker, go ahead and go to > File > Save project as > type in your desired name and select to save the movie as an mp4 file. Unscreen is compatible with mp4, .webm, .ogg, .mov, .gif.
Hop on over to Unscreen and upload your mp4 there by dragging and dropping it.
Unscreen will automatically remove your background in under a minute using AI technology.
Once the video is done, you’ll see a preview of what it looks like without the background.
By going to > Change Background below the preview, you can also change the background to an image, color, or even another video background.
Play around with your options until you’ve found the effect you’re going for, and once you’re happy, go ahead and download it. Unscreen offers to download a GIF of your video with a new background for free, but if you want the full-length video, you can also opt for either a Pay as you go or a Subscription option. To find out more about the pricing options, head on over here.
Ideally, you’ll want to download an mp4 and upload it to Movie Maker by going to > Home > Add videos and photos > select the mp4 you just downloaded from Unscreen.
Voilà, there you have it — your video with a completely new background which you can continue fine-tuning and editing in Movie Maker.
How to change video background in Animotica (Windows 10)
Animotica is an excellent Windows editing tool if you’re a little more advanced. By using Chroma Keying, you can remove and change the background of a video that already has a green screen. If your video doesn’t have a green screen yet, we’ll walk you through how you can easily add that with unscreen.com first. You can also use Unscreen directly to change the background of your video and upload it to Animotica as well, so you don’t necessarily have to mess around with chroma-keying.
Hop on over to Unscreen and upload your video of choice.
-
Unscreen will remove the background of your video in just a few seconds; once it’s done, you can either:
Add a green screen by going to > Change Background > Color > Green Screen.
OR you can change the background to an image, video, or color of your choice by using the different tabs. You can even upload your very own image or video.
Once you’ve found the best option, go ahead and download your video. Unscreen offers free GIF. But it’s recommended to download the full mp4 to achieve the best quality and effect; Unscreen offers a Pay-as-You-Go option and Subscription — you can find out more about that here.
Open Animotica.
Create a new project by clicking on > New Project.
Now click on > Add video/ photo clips and add the video you want to use as your background.
Now it’s time to add your foreground, aka. the person or object you want in front of the background. Go ahead and click on > Add video/photo clips again and scroll down to the section labeled > Layers & Overlays and select > Add video/photo.
Now the video will appear as an overlay; you can adjust its size to meet your needs.
Next, you will want to fuse the background and the person or object using the Chroma Key feature. The layers & Overlay toolbar should still be open at the bottom of the tool; go ahead and click on > Chroma.
Here you can toggle the > Chroma effect > ON.
You can also select the chroma key color (if you have a blue or another colored screen) and adjust the tolerance level to smooth out the edges.
You can also watch a quick tutorial by the Animotica team right here.
If you want to avoid using the Chroma Key feature, you can also use Unscreen to add the background of your choice.
We’ve shown you how to add and change the background of a video in many shapes and sizes — whether you want to add a photo, another video, or color using different tools like Unscreen, iMovie, Movie Maker, and Animotica.
Why not give it a try yourself? Hop on over to Unscreen and start testing it today.
Comments